Create a New Portfolio

Perform the following steps to create a new portfolio:

  1. Go to Assess 360. Select Portfolio Management in the Assess 360 landing page. The Portfolio page is displayed.

  2. In the Portfolio page, click Create New Portfolio. The Create New Portfolio page is displayed.

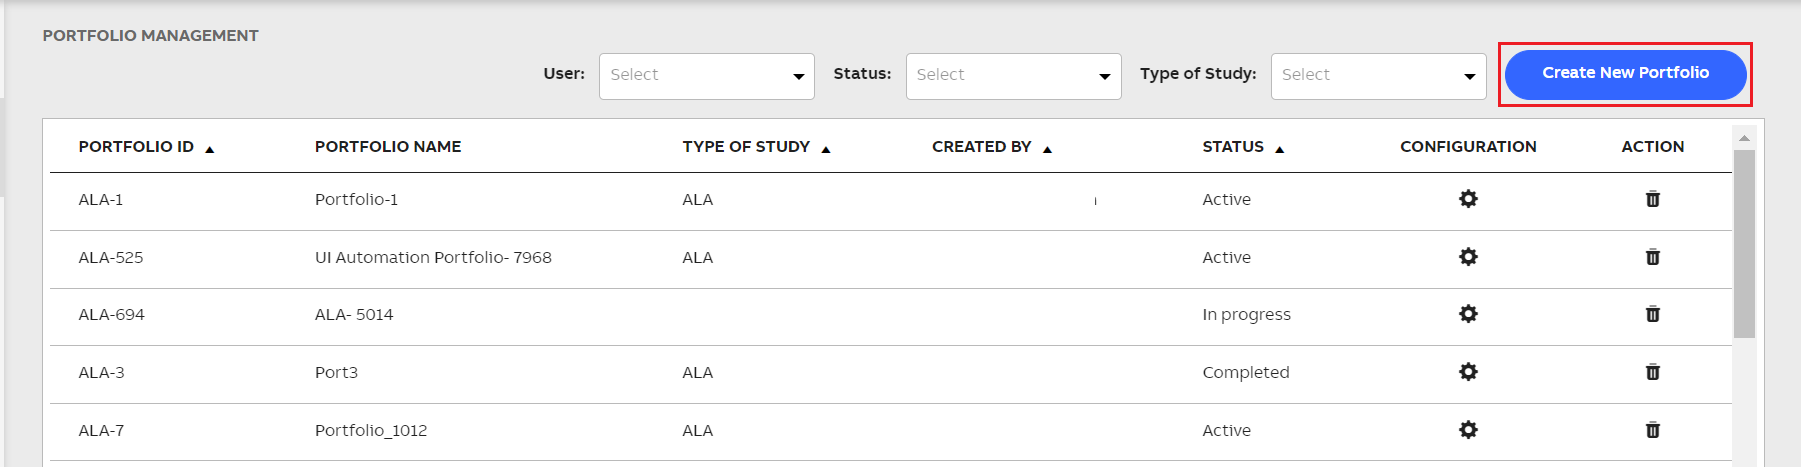
    Create New Portfolio Button

  3. In the Portfolio Name text box, enter the name of the portfolio.

  4. In the Industry text box, enter the specific industry for the portfolio.

  5. In the Client text box, enter the name of the client.

  6. From the Type of Study drop-down list, select the relevant type of study.

  7. In the Description text box, enter the description for the portfolio.

  8. Click the Download Portfolio Template button to download the excel template. This excel template consists of the metadata and structure of the project sections, sub sections and assessments, which a user can update as per the requirement.

  9. Update the details in the following sheets of the downloaded excel template as per the requirement. Accordingly, the sections and sub sections are created and displayed in the Project Management module of the Assess 360 application, which enable you to collect the required data and perform the assessment:

    In the downloaded excel template:

    • Do not edit/add/delete the Header column names.

    • Do not edit the sheet names.

    • Do not add any new sheets or delete the existing sheets.

    • The input type in the "InputType" column must be textarea, readonly, textbox, select or date.

    • The data type in the "DataType" column must be alpha, numeric or date.

    • The "select" in the "InputType" column can have a list of default values, which must be separated by comma.

    The ProjectSections sheet allows you to create the following sections required for a project in the Project Management module of the Assess 360 application.

    In the ProjectSections sheet:

    • Do not change the cell values in the "SectionName" column.

    • Do not change the cell values in the "ProjectDetails" row.

    • You can change the cell values in the "UserLabel" column as required.

    • You can change the cell values in the "SortOrder" column. Avoid any duplicate values in this column.

    • The value in the "IncludeInPortfolio" column for "ProjectDetails" must be FALSE. Do not change this value.

    • You can change the value in the "IncludeInPortfolio" column for the "AssetParameters" as required. It can be TRUE or FALSE, this determines the enabling/disabling of tabs for the Project > Project Item that uses this portfolio.

    • The value in the "IncludeInPortfolio" column for "Review" must be TRUE, as it involves multiple project item approval stages.

    Section Name

    Description

    Project Details

    Allows you to provide the details of the project.

    Item Details

    Allows you to view and assess the basic, operational and constructional details of the project item, which are auto-populated from the Asset Performance Management core.

    Historical Data

    Allows you to add, edit and delete the historical data of the project item such as, design, operational, maintenance, inspection, MOC, leaks and thickness analysis.

    Assessment

    Allows you to view various factors affecting the asset life and provide score and remarks against each of these factors (such as likelihood factor, critical factor and impact factor) based on your assessment. You can also provide overall score, add the damage mechanisms and failure scenarios and create a risk matrix for the failure scenarios of different risk categories.

    Recommendation

    Allows you to provide your recommendation based on the assessment.

    Review

    Allows you to provide the summary of the assessment, assign the reviewer and approver and send it for review.

    Repository

    Allows you to drag and drop or upload any supporting files related to the assessment of the project item.

    The ProjectDetails sheet allows you to create the following fields in the Project Management module > Create New Project > Project Details tab.

    In the ProjectDetails sheet:

    • Do not edit any cell value. Functionality related to this sheet is to capture project details when a project is created.

    • No new rows/columns are allowed.

    Field Name

    Description

    Project ID

    Allows you to view the unique ID of the project, which is auto-generated.

    Project Title

    Allows you to provide the title for the project.

    Client

    Allows you to provide the name of the client for the project.

    Project Administrator

    Allows you to provide the name of the administrator for the project.

    Start date

    Allows you to provide the date when the project starts.

    End date

    Allows you to provide the date when the project ends.

    Description

    Allows you to provide a brief description of the project.

    The AssetParameters sheet allows you to create the following tabs in the Project Management module > Project > Project Item > Item details tab.

    In the AssetParameters sheet:

    • Do not change any value in the "basicDetails" row, as this indicates that the basic details of a Project Item are available by default.

    • The fields (Parameter Name, UoM, Nominal, Lower Limit, Upper Limit, Remarks) in the "FieldName" column are generally common and represent the asset template parameter meta data. It is suggested to add these common fields in the "FieldName" column, when you add any new type of parameter in the "ParameterType" column.

    • You can add new type of parameter in the "ParameterType" column with a different "FieldName" and "UserLabel". The number of fields and their names determine the asset template parameter metadata it is supposed to display.

    • If the "FieldName" does not represent the exact field name in asset template parameter, then they wont be displayed in the Project Item UI.

    Tab Name

    Description

    Basic Details

    Allows you to view and assess the basic details of the project item, which are auto-populated from the Asset Performance Management core.

    Constructional

    Allows you to view and assess the constructional details of the project item, which are auto-populated from the Asset Performance Management core.

    Operational

    Allows you to view and assess the operational details of the project item, which are auto-populated from the Asset Performance Management core.

    HistoricalData

    The HistoricalData sheet allows you to create the following tabs and the respective columns in the Project Management module > Project > Project Item > Historical Data tab.

    In the HistoricalData sheet:

    • In the "Category' column, you can add a new "Historical" category for capturing historical data and add the corresponding fields.

    • You can add new fields in the "FieldName" column of a "Historical" category. Do not add more than 10 fields, as this requires the UI to be extremely wrapped.

    • The value of "ID" in the "FieldName" column can be user specific.

    • The "select" in the "InputType" column can have a list of default values.

    • You can change the value in the "Mandatory" column for "Leaks" > "Status" as TRUE or FALSE to include or exclude the validation process.

    Tab Name

    Column Name

    Description

    Design

    ID

    Date

    Findings

    Major Modifications

    Remarks

    Allows you to add, edit and delete the historical design data of the project item.

    Operational

    ID

    Date

    Findings

    Major Modifications

    Remarks

    Allows you to add, edit and delete the historical operational data of the project item.

    Maintenance

    ID

    Date

    Findings

    Major Modifications

    Remarks

    Allows you to add, edit and delete the historical maintenance data of the project item.

    Inspection

    ID

    Inspection Date

    Inspection Type

    Observation

    Activities Carried Out

    Summary

    Allows you to add, edit and delete the historical inspection data of the project item.

    Leaks

    ID

    Component Damaged

    Date

    Material Of Construction

    Reason Of Damage

    Action Taken

    Status

    Remarks

    Allows you to add, edit and delete the historical data related to leaks of the project item.

    MOC

    MOC Number

    MOC Type

    MOC Creation Date

    MOC Description

    Potential Impact

    Completion Date

    Status

    Allows you to add, edit and delete the historical MOC (Management Of Change) data of the project item.

    Assessment

    The Assessment sheet allows you to create the following tabs and the respective fields in the Project Management module > Project > Project Item > Assessment tab.

    In the Assessment sheet:

    • Each row determines the type of factor that is being assessed. You can edit this sheet as required. For each type, you can add new factors in the "Category" column with "Score Min" and "Score Max" values to determine the range within which the input is acceptable.

    • By default, the value of "AssetClass" and "AssetSubclass" is Common. This indicates that the factor type is common across all the asset class and subclass.

      You can define a new "AssetClass" and "AssetSubclass", so that the assets which belong to the defined asset class/subclass when being part of the project will display the configured factors along with the common factors.

      If you are not aware of the "AssetClass" and "AssetSubclass" of the factor, you can keep the value as Common.

    Tab Name

    Column Name

    Description

    Likelihood Factor

    Type

    Allows you to provide the type of the likelihood factor affecting the project item. It can be:

    • Design

    • Construction

    • Operation

    • Maintenance Policy

    Factor

    Allows you to provide the list of likelihood factors affecting the project item. It can be:

    • Is the specified performance / capacity / rating suited to actual requirements?

    • Level of Quality Assurance?

    • Do we operate within the specified design envelope?

    Score

    Allows you to provide a score based on you assessment. It can be 1, 2, 3, 4 and so on.

    Remarks

    Allows you to provide your remarks based on your assessment.

    Critical Factor

    Type

    Allows you to provide the type of the critical factor affecting the project item. It can be:

    • Design

    • Construction

    Factor

    Allows you to provide the list of critical factors affecting the project item. It can be:

    • Production critical?

    • Spares are obsolete?

    Score

    Allows you to provide a score based on you assessment. It can be 1, 2, 3, 4 and so on.

    Remarks

    Allows you to provide your remarks based on your assessment.

    Impact Factor

    Type

    Allows you to provide the type of the impact factor affecting the project item. It can be:

    • Design

    • Construction

    Factor

    Allows you to provide the list of impact factors affecting the project item. It can be:

    • Do we operate within the specified design envelop?

    • Can we detect onset of Deterioration?

    Score

    Allows you to provide a score based on you assessment. It can be 1, 2, 3, 4 and so on.

    Remarks

    Allows you to provide your remarks based on your assessment.

    RiskMatrix

    The RiskMatrix sheet allows you to define the different types of risk categories (such as Operational, Environmental, Safety and Business) and configure the number of levels of a risk matrix in the Project Management module > Project > Project Item > Assessment > Risk Matrix tab, which enables you to evaluate and mark the level of risk associated with each failure scenario in the risk matrix.

    In the RiskMatrix sheet:

    • Do not add/edit/delete anything.

    • You can edit the value in the "Definition" column as required, post the matrix data generation.

    Risk-Matrix

    The Risk-Matrix sheet allows you to define each level of risk matrix in the Project Management module > Project > Project Item > Assessment > Risk Matrix tab.

    In the Risk-Matrix sheet:

    • The "xLevel" and "yLevel" determine the maximum size of the Risk Matrix. The value of "xLevel" and "yLevel" must not exceed 7.

    • The "Risk Category" column lists the different risk categories for which the Risk Matrix needs to be created. You can select one or more risk categories in the "Risk Categories" column and click the "Generate Matrix" button to generate the Risk Matrix data, which will appear in the RiskMatrix sheet.

    • The "xLabel" column lists the labels for the risk categories on X axis.

    • The "yLabel" column lists the labels for the risk categories on Y axis.

    • The "xPt" column lists the sequence of the X axis data points. Do not change the sequence. The data points must be according to the value of the xLevel.

    • The "xVal" column lists the labels of the X axis data points.

    • The "xDefinition" column lists the default X axis point definitions.

    • The "yPt" column lists the sequence of the Y axis data points. Do not change the sequence. The data points must be according to the value of the yLevel.

    • The "yVal" column lists the labels of the Y axis data points.

    • The "yDefinition" column lists the default Y axis point definitions.

    • The "Generate Matrix" button generates the matrix for the selected Risk Category in the RiskMatrix sheet.

    Recommendation

    The Recommendation sheet allows you to create the following columns in the Project Management module > Project > Project Item > Recommendation tab.

    In the Recommendation sheet:

    • The "FieldName" column lists the form fields which will be available in the Project Item which uses this portfolio.

    • You can add new rows.

    Column Name

    Description

    ID

    Unique ID of the recommendation.

    Title

    Title of the recommendation.

    Creation Date

    Date when the recommendation was created.

    Description

    A brief description of the recommendation.

    Action Type

    Type of action recommended, it can be major repair, replacement and so on.

    Priority

    Priority assigned to the recommended action.

    Estimated Cost

    Cost estimated to perform the recommended action.

    Estimated Cost UoM

    Cost estimated to perform the recommended action in UoM.

    Assigned To

    Name of the user to whom the recommended action is assigned to perform.

    Cost Type

    Type of cost for the recommended action.

    Reviewer

    Name of the user to whom the recommendation is assigned to review.

    Approver

    Name of the user to whom the recommendation is assigned to approve.

    Target Date

    Date by when the recommended action must be performed.

    Status

    Status of the recommended action, can be draft, approved and so on.

    Review

    The Review sheet allows you to create the respective fields in the Project Management module > Project > Project Item > Review tab, which allows you to provide the summary of the assessment and select the reviewer and approver for review.

    This Review sheet can be left blank. Do not add any new rows.

    ReviewerApprover

    The ReviewerApprover sheet lists all the names of users who are assigned with the reviewer and approver roles.

    In the ReviewerApprover sheet, you can add the Portfolio's Reviewers and Approvers names. The excel template must be reviewed and approved before being uploaded from UI.

  10. Click the Upload Portfolio Template button to upload the updated excel template.

  11. Click Submit to create the new portfolio. Click Cancel to go back to the Portfolio page.

 Create a New Portfolio